
As our meetings, conferences, happy hours and events move online, so too must we adapt. We've had a live production setup for years now but we weren't prepared for the diversity of need in todays streaming world. As such, we've adapted and upgraded our system to handle all the different cameras with their unique formats, the diverse video sources for presentations and showcases, remote interviews and hosting, and all the streaming destinations you can think of.
What follows is the begging of a larger breakdown of all the pieces you see in the image below. We've done a lot of research and learned a lot of lessons to get to this point. Steal the parts that can help you in your setup, ask questions on Facebook or below, and let us know if you think we're missing something.
Full disclosure, these are affiliate links below. Since we'll link and recommend products from retailers we love, it just makes sense. We'll never share or link to products that we don't use or think are worthwhile.
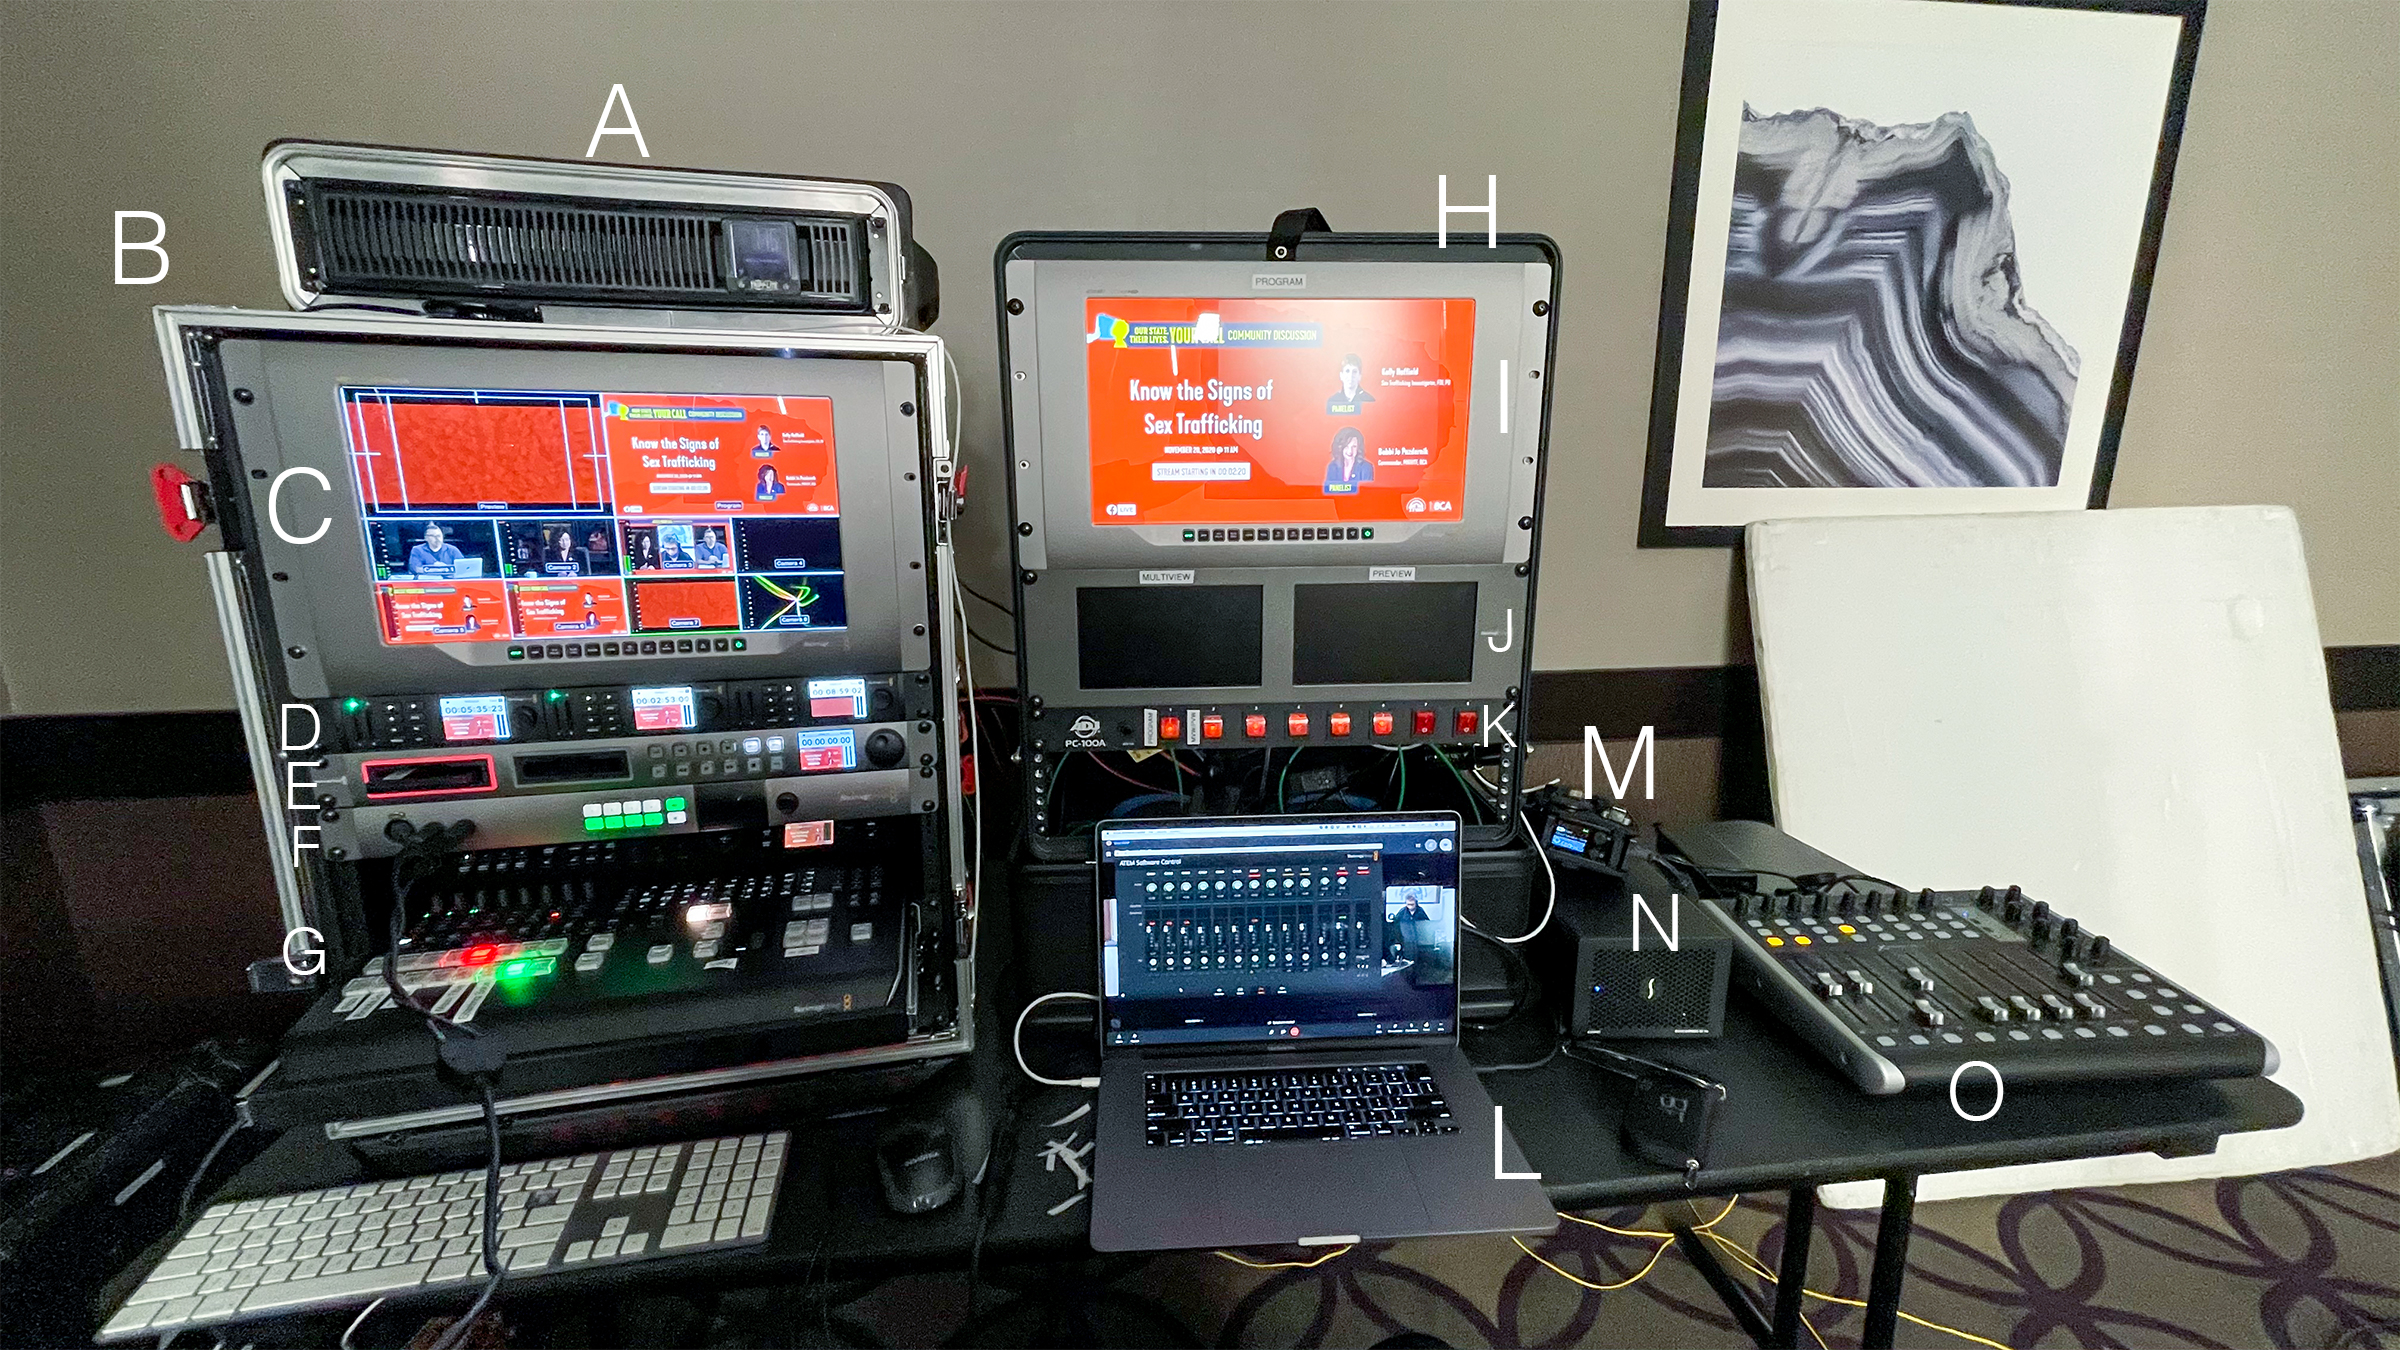
Take a look at the picture below. It's broken down to all the visible items, and we'll have a few hidden items that we discuss too.
This configuration gives us a huge range of functionality while all fitting in a few travel ready cases. Some of the major features are:
- Ability to take any format of input no matter the resolution or frame-rate, SDI or HDMI
- Ability to load up video, cue, and play it all through the hardware without needing another computer
- Manual audio control (this is huge)
- Additional i/o with complete graphic control by computer
- Physical buttons for everything, you can switch without a computer
Below is an explanation of all the pieces.
- Tripp Lite SMART1500LCDXL 1500VA Smart UPS Back Up
- The whole system runs off of this UPS. If the power goes out we'll be able to run for 13 minutes or so. Whether we wait for the power to come back on, or if we need to save everything and turn off. The whole configuration only takes up 25% of the working capacity of the UPS.
- Gator Case (G-TOUR 14U CAST)
- A case that is rugged for travel but has enough space for the primary switching functionality. This case also has wheels but we took them off since we put this on a tabletop.
- Blackmagic Design Smartview 4K
- We have two of these. They serve as a very decent confidence monitor. The color is also pretty great on them. Best part is they're a great monitor in a rackmount format.
- This monitor is used for the multiview from the atem switcher.
- Blackmagic Design 3 x Hyperdeck Studio Mini ( w/ 3 angelfire sd cards)
- These are key to just about everything we do. We can cue up video and play them directly into the ATEM TVS. No longer do you need a laptop with a presentation to play this content. The cueing and playing can also be automated with macros. Imagine, you just click a macro button, labeled on your script, and automatically the video starts playing and switches to that input.
- The angelfire cards are high quality cards with the speed to play back high quality video in real time.
- Blackmagic Design Hyperdeck Studio
- This piece is a tried and tested way to record the program. Since you can use whatever SSDs you want (as long as they're fast enough) you can get big ones.
- Blackmagic Design ATEM Studio Converter
- This is special to our setup since we have 3 studio cameras and an additional 2 studio converters. It is so much easier to use fiber to run video to and from your camera than to run multiple sdi cables.
- This also allows for talkback and tally with all your cameras.
- Blackmagic Design ATEM Television Studio 4k
- This it the brain of the system. It is a switcher and control panel all in one. Having a physical panel, and not using the gui on a computer, has been a game-changer.
- The TVS 4k also has 8 inputs with resolution/framerate conversion built in! This save us from having to convert every input. Inevitably some cameras believe 24 to have different frame-rates and working with computers is never consistent. With the TVS 4k it doesn't matter, just plug in a source and you're off to the races.
- It also has many macro buttons. This allows you to make macros as complex or simple as you like. I've done this to cue up, play, and switch to video sources in the hyperdeck minis, I've also had it load up lower third graphics, turn on the keyer with the current source, then switch the lower third on. If you can do it manually, you can make a macro out of it.
- Gator Case (12U Pop Up)
- This is another great find. I wanted to have another monitor and a few accessories but I didn't want another huge 14U case. This case is for an audio mixer but with a little modification to the tracks on the side it tilts vertical for great monitor viewing.
- Blackmagic Design Smartview 4K
- See above. In this instance, it use used for the program feed.
- Blackmagic Design Smartview Duo
- These are leftover from the previous build. I like to use them for the preview and program. It allows someone else to work on the right side/case and still see what is being switched and what's coming up.
- 8 Channel Power Strip
- This is awesome. Before everything turned on or off with the UPS. With these switches, I can turn on or off any one thing at a time. It feels like you're beginning an ignition process on a spaceship. I like to be able to turn on/off one thing at a time instead of all at once. Probably doesn't matter much but I like it!
- Macbook Pro 2020
- I use this for a few things: Open Broadcasting System (OBS), pull in remote interviews with Skype, the internet (checking the stream and communicating), loading graphics into ATEM.
- OBS is used to mix in video with graphics in a way that the ATEM cannot do. This allows me to do Picture-in-Picture (PIP) and have graphic overlays and other complex things. The only issue I've recently discovered is that this introduces a half second or less delay in the video. I need to change the setup to accommodate for that so that audio is always in sync.
- The computer also allows me to connect to any number of remote interviews and pull them into the stream. They come into OBS with NDI from Skype then I can send them out to the ATEM board. the only issue is the remote talent's internet connection. Otherwise the NDI into OBS has been darn near flawless.
- It's also easy to load graphics into the ATEM and change any settings necessary from this computer since it's so fast.
- LiveU Solo
- I love this streaming device. I could just stream through OBS if I wanted but this device works in so many different ways. The biggest difference is that it has network bonding built in as well as the ability to connect to cellular modems. I use it when I'm not sure about the data connection I'll have. I can connect to up to 2 different cellular networks, 1 ethernet network, and 1 wifi network. Then the LiveU Solo system will recombine the footage to make for a strong uninterrupted system.
- It's simple and it just works.
- It can also just be used directly with a camera if needed.
- Sonnet Echo Express SEIIIe Thunderbolt 3 Edition (3-Slot PCIe Card Expansion Chassis) w/ 1 x Blackmagic Design Decklink Duo 2 PCIe Card and 1 x Blackmagic Design DeckLink Quad HDMI Recorder 4K PCIe Capture Card
- This is pretty awesome. It allows for 4 SDI I/O streams to a thunderbolt 3 device (in this case our Macbook Pro). In our setup, I use 3 of the ports as SDI inputs for video that can be used in OBS for graphics. The fourth port is used as an output of the OBS program back into the switcher.
- BEHRINGER MIDI Controller (XTOUCHCOMPACT)
- This is a game-changer. If you've ever used the ATEM GUI to control audio on your stream then you're familiar with lessons in futility. It's awkward and unintuitive to control multiple audio feeds with a mouse. This MIDI controller allows you to control all the ATEM's audio with physical faders.
- It also allows for a separate person to run audio without needing a computer.
Not pictured (in the back or underneath things):
- 3 x J-Tech 1x2 SDI splitter
- These are used to send camera signals out to the Sonnet box to be used in OBS on the Macbook Pro. It allows the signal to go to the Sonnet box in addition to back into the switcher. That way, I can add graphics to the video in OBS, or just show the video without any graphics through the ATEM.
- 3 x Micro Converter BiDirectional SDI/HDMI 3G
- These are intended for computers or any other HDMI devices that we want to take into the TVS 4k which only accepts SDI inputs. I got the bidirectional version because occasionally we need to go the other way.
- Mac Mini (circa 2015)
- This lives in the back of the 14U case. It is connected to the switcher and can be used to manage the ATEM system if you don't have a separate laptop to do things with. Again, this whole system was designed to roll up, open up, and be ready to go with no additional equipment.
- Netgear Nighthawk AC1900
- This networks all of our devices together: the TVS 4k, mini hyperdecks, computers, etc. This is also where we connect our stream ethernet connection into.
- The ATEM devices are on a 192.168.2.0 subnet so as not to conflict with the DHCP of the LAN that we're connecting to.
- It also gives my team internet without connecting to public networks.
- Netgear 8-Port Gigabit Switch
- The nighthawk only has 4 ports so this makes it 12.
- 8 Channel Power Strip
- Same as above! So fun to only turn on/off what you need.
- 12 Port LC Fiber Optic Cable Patch Panel
- This and the SDI patch panel on the back are key to the usability of the whole system. Everything coming into the system comes through these patches so that all the internal cabling can be simplified and always connected. You never plug anything into any of the ATEM devices, you're always just rearranging the items in the patch system.
- This makes it super easy to figure out what goes where and how to get things into and out of the system. No more messing around with all the various I/O on each of the devices.
- The next step to simplicity is labeling all the patch ports so it's clear to other people than just me ;)
- 12 Port SDI Patch Panel
- Same as fiber above but for SDI inputs/outputs.
- Rack Mount Sliding Accessory Shelf
- Right now this does nothing but the intent is that it holds the keyboard/mouse for the onboard computer. I've turned the shelf upside down and turned it into a drawer. Now I just need a keyboard that fits the width.
- Craptons of cables (this is not all). So many color-coded cables. This is intended to make the cabling and management easy to identify and use.
Well that's about it. This is the brains of our live production setup. Next time I'll talk more about the camera and communication aspects of this system. Please let us know if you have any questions or comments below or on Facebook!
This entry was posted in blackmagic, Live Production, Live Streaming, Technology, Hardware