The Setup
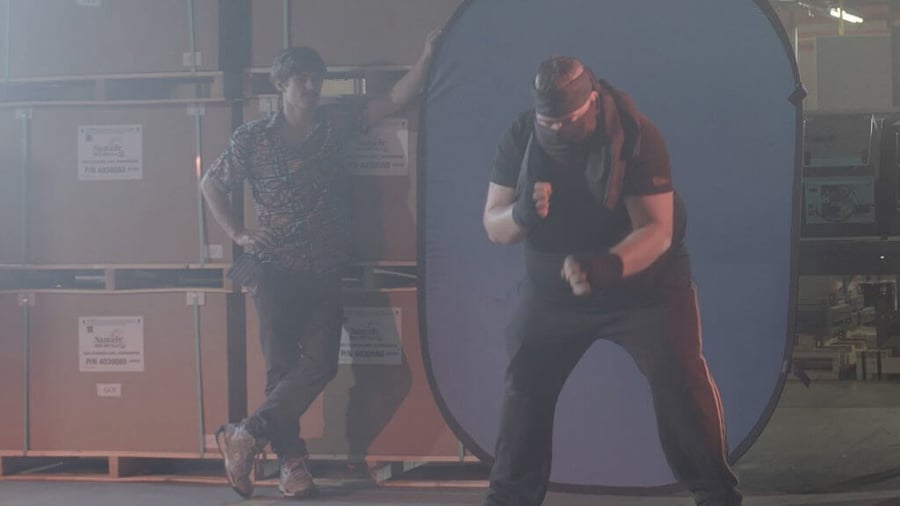
Our hero having just fought off a series of highly skilled ninjas, finds himself trapped as more close in on him. He backs up carefully, eyeing up each fighter and deciding which one to take on next. Before he can attack, he hits an unmovable force behind him. Turning around, he finds himself face to face (or chest really) with a massive figure, breathing and snarling down at him. The haze of the warehouse casting across the 135% larger than real life man briefly obscures his face and it's only then that our hero realizes the man is partially invisible.
Wait, what?
Yeah, about that...
Is the large man supposed to be partially invisible?
No.
Then why is he?
You're getting ahead of the blog post. That's what we're here for today: what to do when you're key doesn't work...shoot, now I'm getting ahead of my own self.
The Issue
A scene was shot that involved two regular sized men fighting one another, however one of the men needed to be "larger than life" or about 35% larger than normal. This is a fairly straight forward visual effect shot as it was filmed with the foreground man in front of a green screen reacting to nothing, the man-to-be-enlarged in front of a blue screen swiping at the foreground man, and an empty background plate for good measure.
Seems pretty straight forward. Why didn't the key work?
I'm getting to that point.
 All the blue haze only a mother could love* (*= this is a lie)
The set was dramatically lit with blue and red lights on both sides of the actors, and shot in standard raw flat profile to make color correction easier later on. The location was then filled with a slight haze to finalize the look (which looks amazing on film, however added another level of difficulty when compositing the sequence together).
The haze, combined with the flat profile, faded the blue screen behind the 135% man causing the screen color to come out closer to that of the exposed skin of his body (which had a blue cast to it due to the light shining from off camera).
Ooooohhhh....
The issue was completely unintentional as the scene was shot exactly how you should have done it (maybe without the haze added but visual effects houses constantly have to work with footage not shot or intended to be visual effects shots). However a combination of the flat profile, the haze, the lighting, and the clothing worn by the actor, resulted in a shot where a key couldn't be pulled cleanly.
No matter how hard you tried...
No matter how many instances of Ultrakey you applied to the shot...
It quickly becomes apparent that you have to...
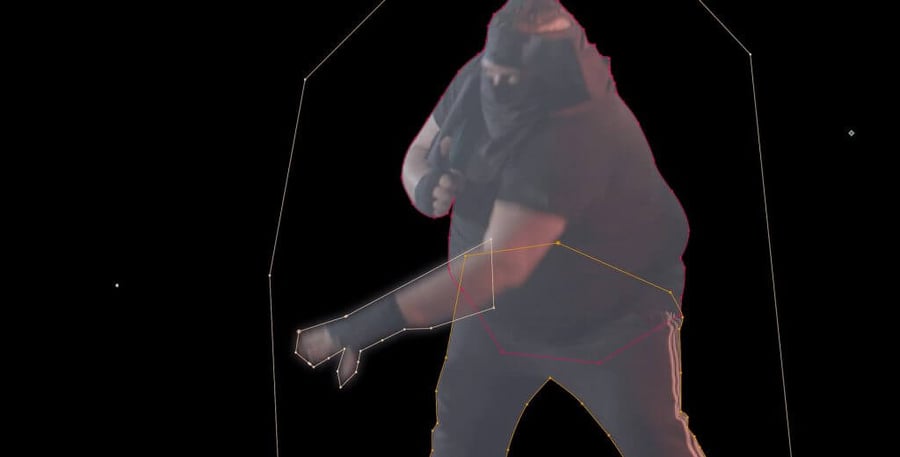
ROTOSCOPE THE MAN OUT BY HAND!!!!
::cue suspenseful orchestra hit::
The Fix, Part 1: Deciphering Your Stuff
Okay, it's really not that big of a deal. Over the years After Effects and other compositing software has gotten easier to use when it comes to rotoscoping. A few years back, After Effects even added the Rotobrush which works decently when used on properly shot footage (or if you're looking for a horribly pixelated/rough edge appearance on footage not properly shot). Many times when it comes down to it, a hand done rotoscoping job is your best option even if you don't want to admit it.
Here is what you quickly realize when looking at the work before you:
- The sequence itself only consisted of two shots and each was approximately 3 1/2 seconds in length (a choice made during the editing portion of the video and designed to minimalize the amount of work needed on the vfx).
- The foreground man's key works without issue since he was filmed in front of a green screen. A traditional use of Ultrakey with some tweaks and adjustments, some very minor removal of the green screen's black edging using masks (seriously, why does it have a black edge around it?!), and you've got an element that needs to additional attention.
- The empty background plate is super helpful because there was a box in frame for both actor shots and now you can remove it easily (see my previous article "Replace the Garbage Can" for more on stuff like that).
 I imagine this is what Sherlock sees when he goes into "detective mode" except with better graphics
So you know what you have to do but how do you start?
- Grab a cup of coffee or other caffeinated beverage
- Turn on Spotfiy to an artist you enjoy listening to (NOTE: Preferably someone with a lot of music; this is going to take awhile)
- Open your After Effects comp, grab the pen tool, and start tracing.
No really, that's basically it.
What? No detailed breakdown of every single step like in the previous article?
No, honestly, there's no right or wrong way to rotoscope someone. Some users will tell you to do a highly detailed mask for every single frame. Others will say you should do a rough mask (still getting close to the subject obviously) and do it every so often.
Me? I say do a combination of both.
The direction you go will be based upon the footage you're rotoscoping out. For this project, the actor didn't move much below the waist, which meant I could get away with a mask that I only had to animate every 10 or 15 frames (instead of EVERY frame). His upper body moved quite a bit since he was flexing and swinging at the protagonist. For that, I simply went through every 15 frames and made keyframes. Then scrubbing back through the footage, I watched to see how well After Effects followed the motion the actor was doing. For the most part it followed along well, only needing to make a few minor adjustments here and there.
Of course this is just how I accomplished this shot in the time I had available. If I had more time or others helping, we could have gone back through and done even tighter roto work around the actor. However I knew there would be an old film grade added over the footage which would defocus and add grain/grit to the shot, covering any minuscule rough edges.
Before & After Comparison
TLDR; For you skimmers, here’s a lesson recap
- No matter how much you plan, you always run the chance that your footage isn't going to work like you thought.
- Don't animate every single frame of a mask unless absolutely necessary. Let After Effects figure out the in-between stuff first.
- Rotoscoping a shot by hand sucks, but is doable. That's what Spotify is for.
- Don't feel like you have to take on the entire scene in a single mask. Do parts at a time to help minimize what might seem like too much.
This entry was posted in Video, after effects, ninjas, special effects, editing, rotoscoping, Tips